

iPhone Security Secrets: 8 Apps and Settings You Must Know
Posted by CHRISTINE CHAN

We use our iPhones for everything, so it’s pretty sure bet that we have some sensitive data on them. We may not give this information a second thought, but what happens if someone else gets hold of your phone, or your device gets hacked?
Fortunately, there are ways to keep your data safe and protected on your device, making it harder for unauthorized people to see it. We’re going to cover those now.
1. Keep iOS Up to Date

The best way to keep your iPhone (or iPad) secure is to always have the most recent version of iOS installed. This is important because when hackers find security weaknesses in iOS (or any operating system), Apple patches them in the next software update.
To keep your iPhone up to date, you can install software updates over-the-air (OTA) or on your computer through iTunes.
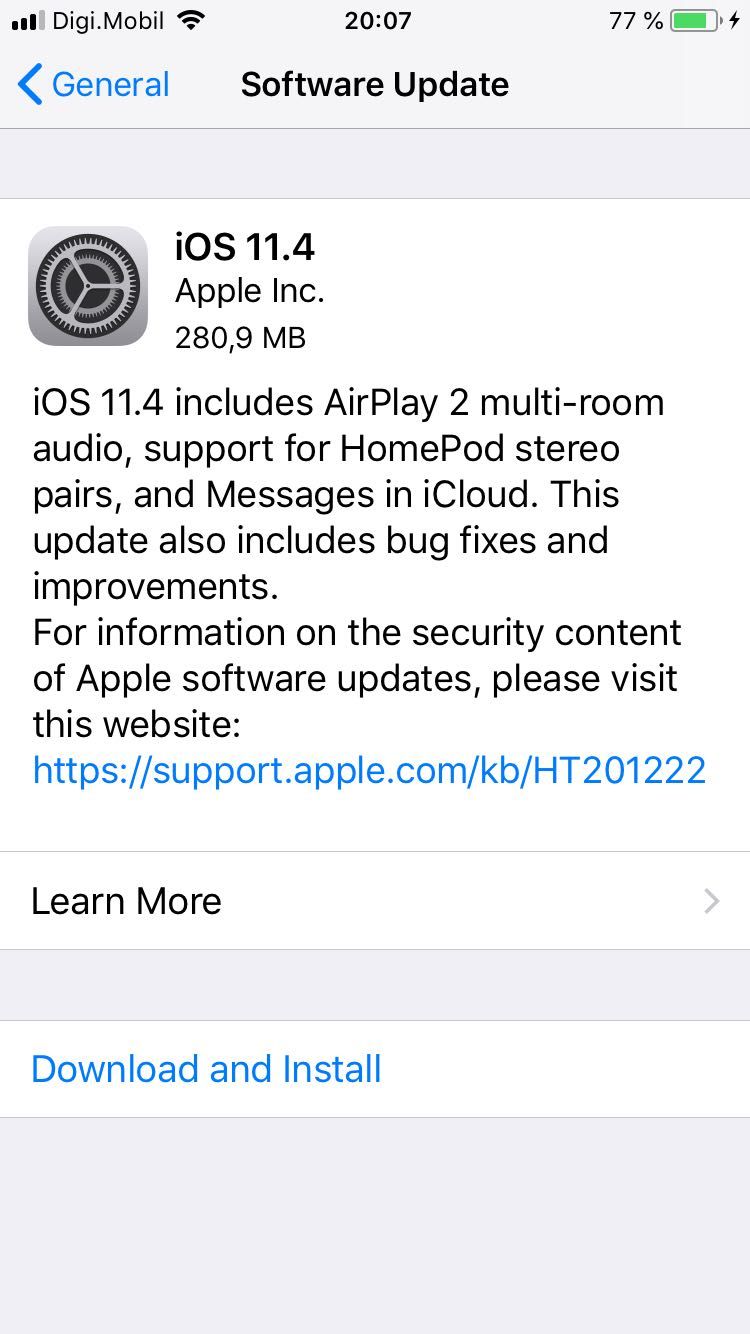
For OTA updates:
- Go to Settings > General > Software Update.
- If there’s an update to install, tap the Download and Install option. If you’re current, you’ll see a Your software is up to date message.
- When the update is installing, you’ll see the Apple logo on the screen with a bar to indicate progress. Once it’s installed, your iPhone or iPad restarts automatically and you’re good to go.

To update through iTunes:
- Plug your iPhone into a computer that you trust (you may see a prompt if it’s a new computer).
- Open iTunes and select your device in the upper-left corner of the window.
- Click on Summary in the sidebar, and then click Check for Update.
- If you’re up to date, iTunes will tell you. If an update is available, just select Download and Update. You may need to enter your passcode on your device if it’s locked.
Keep in mind that iTunes can be a bit slower at detecting new software updates than OTA. I’d recommend doing updates OTA for convenience, but if you can’t, then updating through iTunes is a fine alternative.
2. Activate Find My iPhone
Not only does Find My iPhone help you locate your lost iPhone, but you can also use it to remotely wipe your data in case it gets lost or stolen.
To activate Find My iPhone:
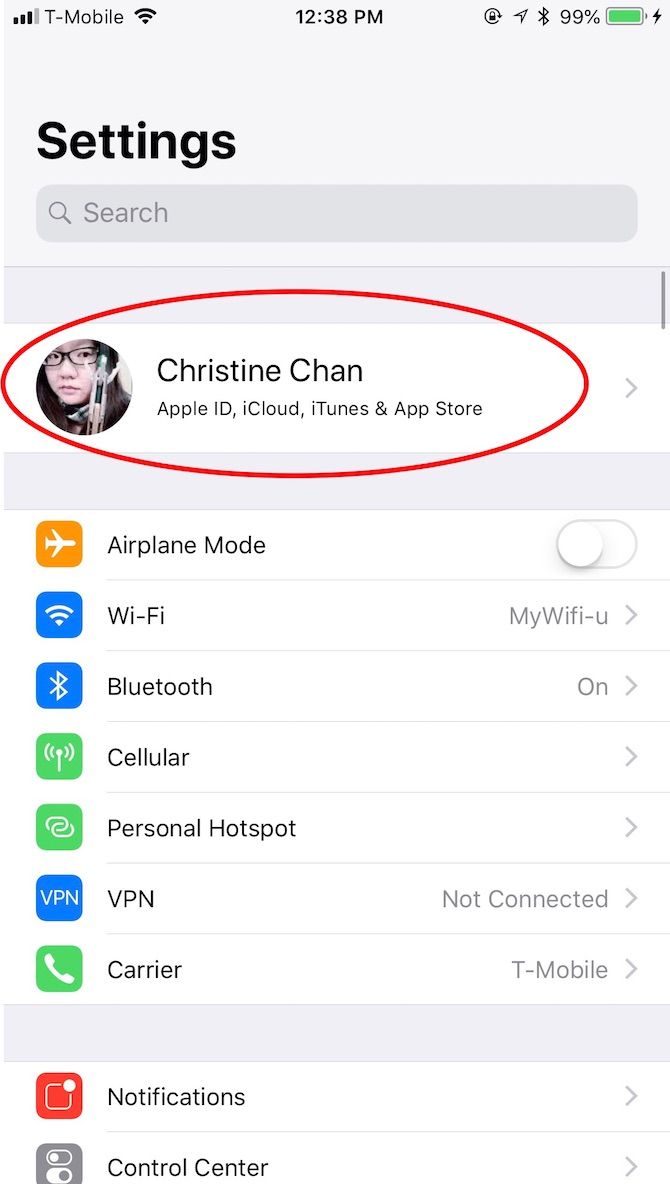
- Go to Settings > iCloud.
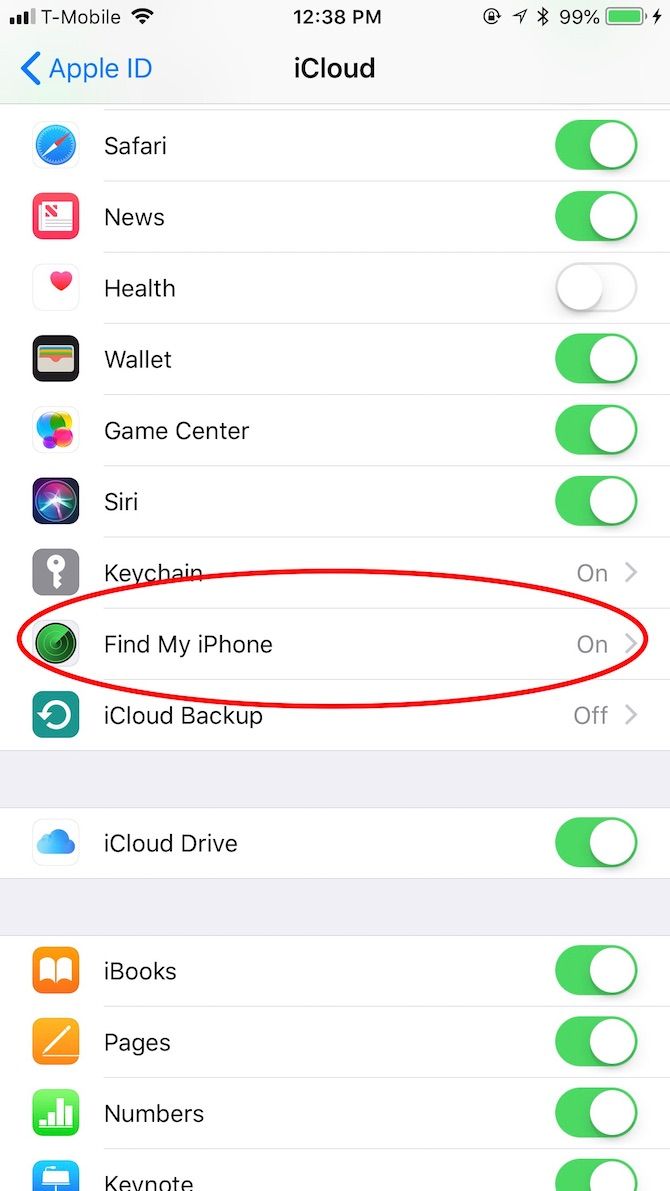
- Select iCloud, then scroll down to Find My iPhone.
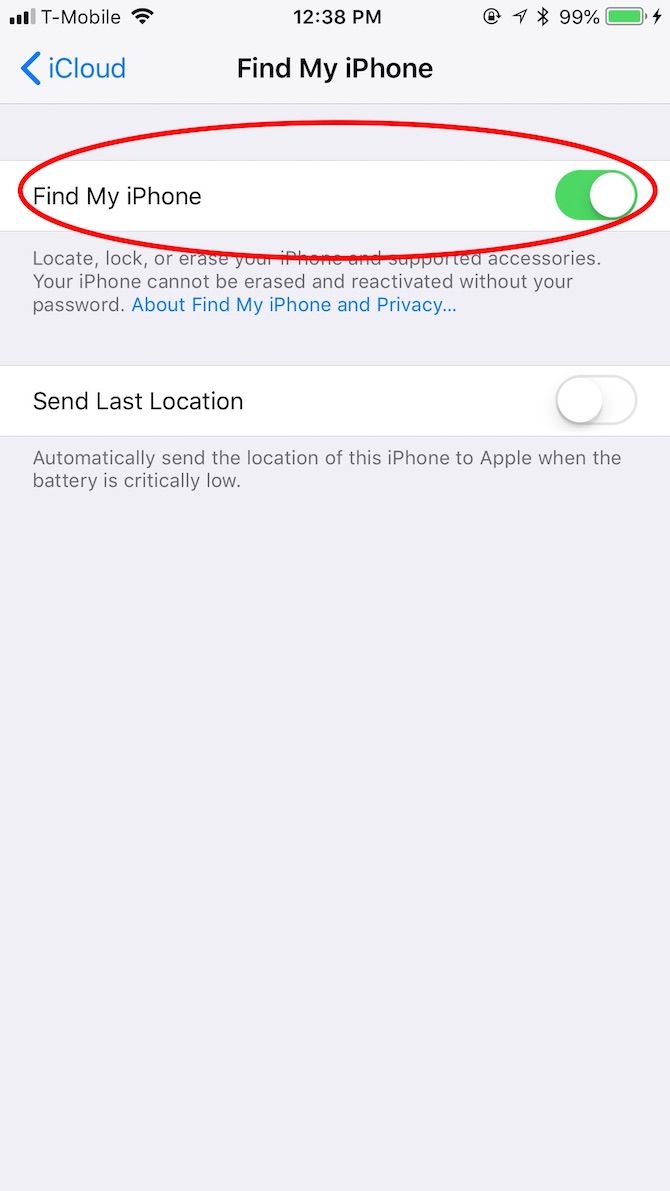
- Tap on Find My iPhone and make sure that the toggle is green to enable it.
- You can also enable Send Last Location, which automatically sends the last location of the iPhone when the battery reaches a critically low level.

To use Find My iPhone to locate or remotely wipe your device:
- Log into your iCloud account from a different iOS device or from the iCloud website.
- Select Find My iPhone.
- By default, Find My iPhone displays all your linked devices on which Find My iPhone is already active. Click the dropdown menu at the top to select an individual device.
- There are three options for all devices: Play Sound, Lost Mode, and Erase iPhone.
- Play Sound sends a signal to your device to help you locate it if it’s nearby.
- Lost Mode allows you to write a message (including a contact number) that displays on the lock screen of the iPhone.
- Erase iPhone will reset all settings and information stored on the device next time it connects to the internet.
3. Use Two-Factor Authentication
With today’s regular data breaches and hacks, you can never be too safe. That’s why everyone should enable two-factor authentication (2FA) on their iCloud account.
When you enable 2FA and sign in from a new device for the first time, you’ll get a prompt for a six-digit verification code. This code is shown on your trusted devices.
Thus, enabling 2FA on your account means that even if someone gets your password, they still won’t be able to get in unless they get that code from one of your trusted devices.
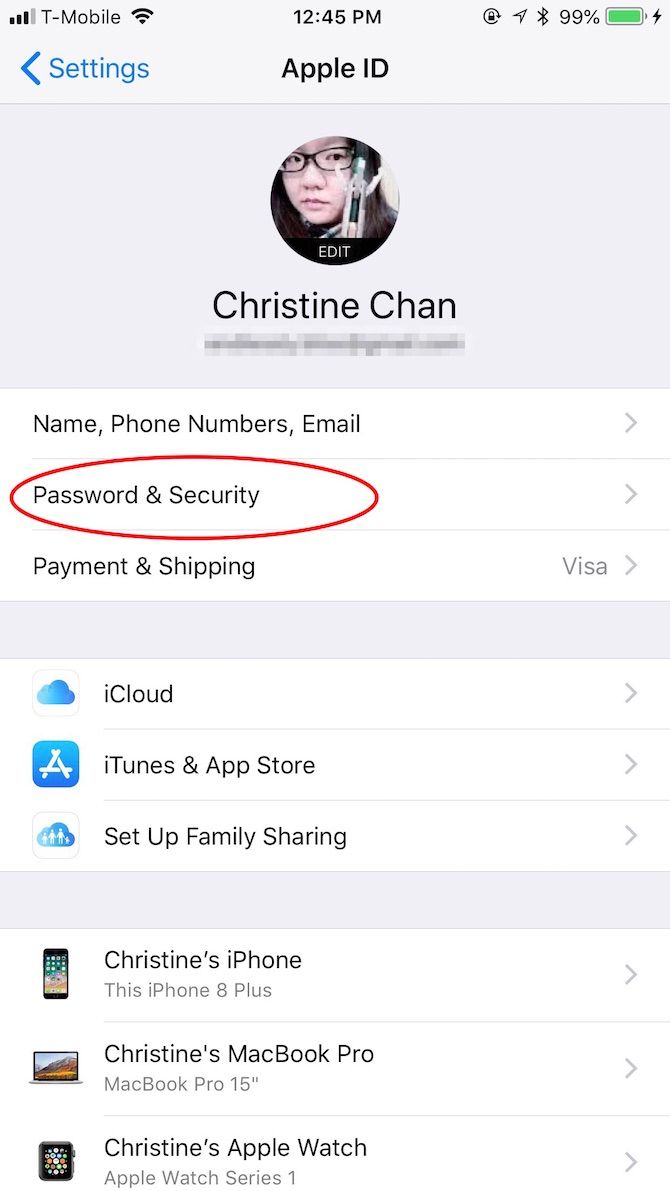
To turn on 2FA on with your iPhone:
- For iOS 10.3 and later, go to Settings > [Your name] > Password & Security. If you’re using iOS 10.2 or earlier, you can still access 2FA by going to Settings > iCloud > Apple ID > Password & Security.
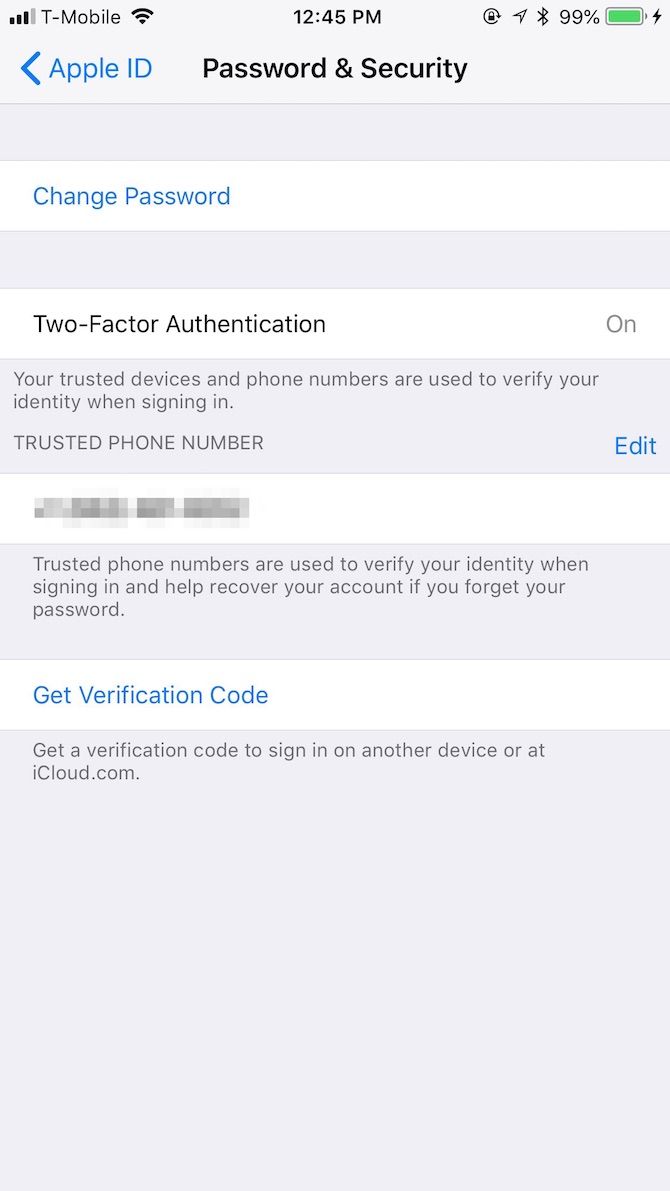
- Tap on Turn On Two-Factor Authentication, and then Continue.
- The next step is to enter and verify your phone number. Doing this allows Apple to send you verification codes by text or phone call.
- Once you complete this step, Apple sends a code to that number using your chosen method. Input that verification code, then 2FA is enabled for your account.
4. Use a Longer Passcode

Four-digit passcodes don’t allow for many combinations, making them easy to crack. Six-digits codes take longer to crack, but not by much. To ensure your data is safe, it’s best to use longer numeric passcodes (eight to 10 digits) or even an alphanumeric passcode, which can consist of numbers and letters.
To change your passcode:
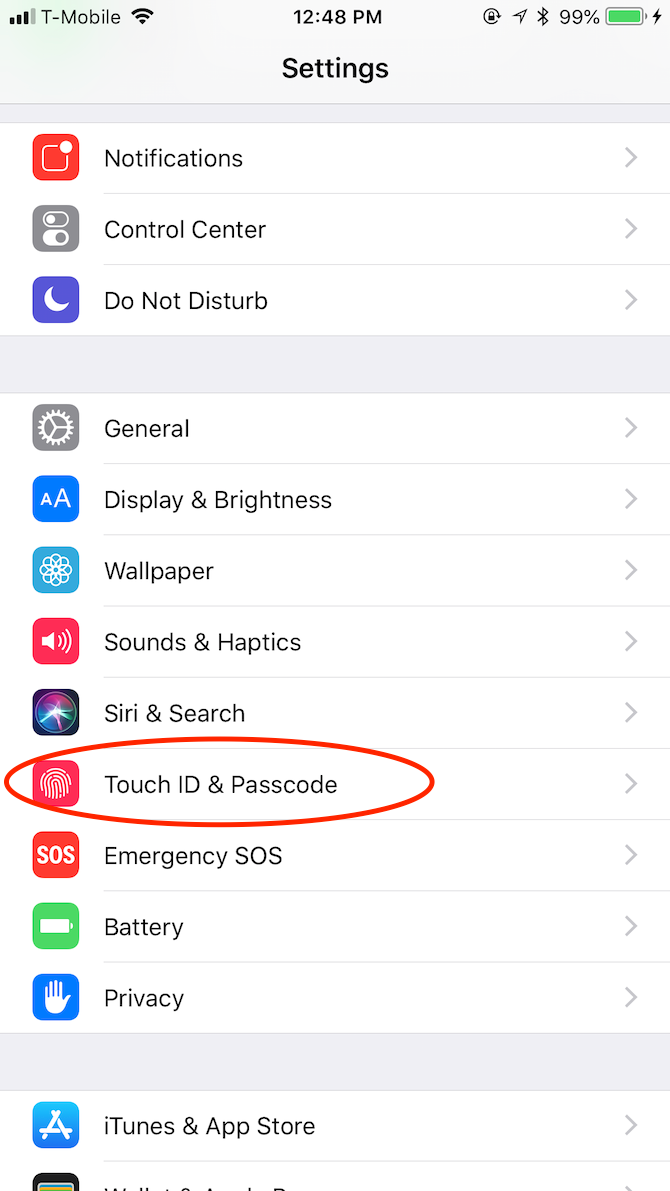
- Go to Settings > Touch ID & Passcode (or Face ID & Passcode for iPhone X users).
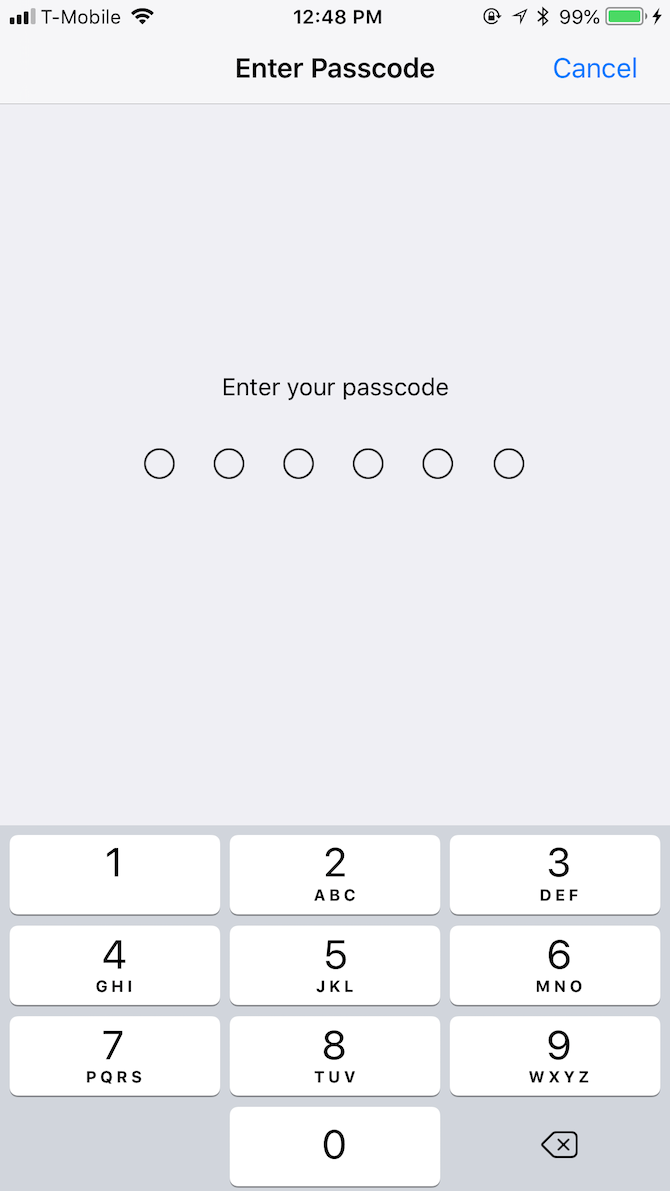
- Confirm your current passcode.
- Select Change Passcode.
- Re-enter your current passcode.
- Enter a new passcode. If you were using a four or six-digit passcode previously, tap on Passcode Options. This brings up Custom Numeric Code and Custom Alphanumeric Code.
- Tap the passcode type you want to use, enter your new code, verify it, and it’s set.
5. Automatically Wipe iPhone Data

Apple provides another handy feature to strengthen your passcode. An iOS setting called Erase Data kicks in after 10 failed passcode attempts. If enabled, everything on your phone gets nuked if you input the wrong passcode 10 times on the device. This protects against someone getting ahold of your device and trying to force-unlock it.
Note that the chance of someone accidentally erasing your phone with this feature is slim. After five incorrect attempts, your phone times out for an increasing span of time before you try again. This means that it would take hours for someone to enter the wrong passcode 10 times, which is unlikely even for children or annoying friends.
To enable Erase Data:
- Go to Settings > Touch ID & Passcode.
- Enter your current passcode.
- Scroll down until you see Erase Data.
- Make sure the toggle is green to enable it.
6. Turn Off Siri

While Siri can certainly be helpful, it can also give out personal information to the wrong people on your lock screen. Fortunately, there’s a way to prevent this from happening:
- Go to Settings > Touch ID & Passcode.
- Enter your passcode.
- Scroll down to Siri under the Allow Access When Locked section and turn it off (a white slider instead of green).
7. Turn Off AutoFill

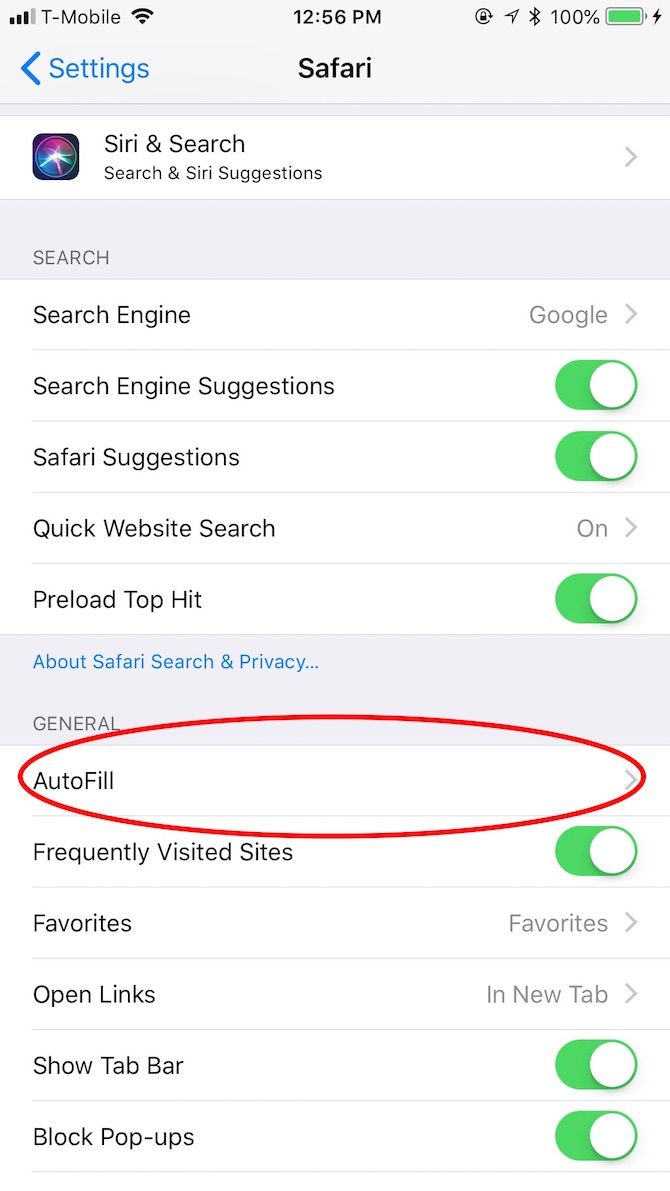
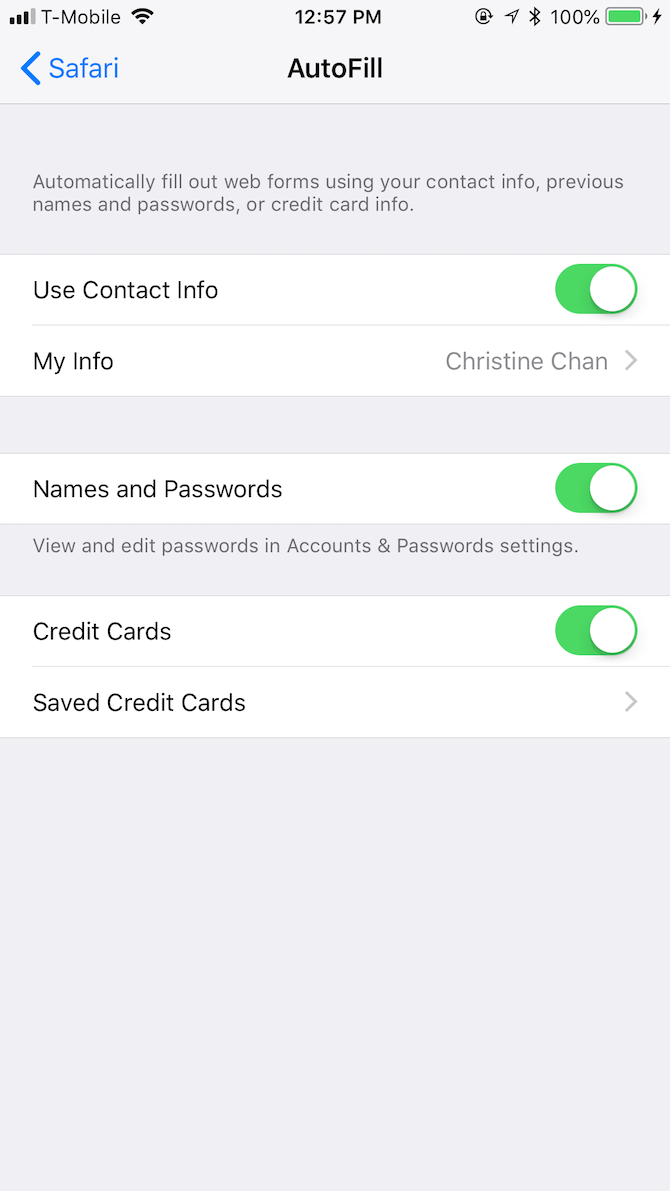
Apple’s Keychain feature stores your account login passwords and even credit card information in your iCloud account. You can then use the AutoFill functionality to have iOS automatically fill your info into selected fields in Safari.
While it’s convenient for those information you have trouble remembering, it can spell trouble if someone ends up with your phone and bypasses other security measures. Like Siri, you can turn off AutoFill for security purposes:
- Go to Settings > Safari > AutoFill.
- Turn off the toggle for each setting (Contact Info, Names and Passwords, and Credit Cards).
8. Use Apps That Secure and Encrypt Your Data
We’ve covered some of the best built-in ways to protect your iPhone’s data from prying eyes. But it’s also important to make sure that your data is safe when you’re accessing the internet or sending messages on your phone.
Note that iPhone antivirus apps are essentially useless. You’re better off using apps like the ones below to actually protect your privacy and security.
Secure Messaging Apps for iOS
Though all of Apple’s devices use iMessage for chat and Apple respects user privacy, this may not be enough for you. That’s when you should look into some secure iOS messaging apps that are reliable and put security as their number one priority.
Wickr is one of the top options if you’re seeking AES 256-bit encryption for your messages. With Wickr, you’ll get self-destructing messages that let you set a timer for how long they last. There’s even a whitelist feature so you can hand-pick the people lucky enough to see your message. It’s also available on Android, so it’s cross-platform.
Another popular option is Telegram, which utilizes end-to-end encryption on secret chats you participate in. It’s fast and the company claims it’s more secure than WhatsApp and Line. Plus it’s available on Android, so you can talk with anyone.And it’s completely free.
Encrypt Your Data Connection With a VPN
Your sensitive information is vulnerable to theft through unsecured connections. That’s why there are virtual private networks (VPNs) that you can utilize. They protect your browsing data and provide other benefits.
We’ve previously covered the best VPN services to use on your iPhone, and our top choice is ExpressVPN because it gives you the best bang for your buck.
Stay Safe and Secure on iOS
Keeping your sensitive information secure on your iPhone may sound a bit overwhelming, but it’s easier than you think, especially compared to the security of Android devices.
Other small habits will help keep your device safe. These include not tapping on any suspicious links, revoking app permissions for or uninstalling apps you don’t trust, using Touch ID or Face ID when possible, not jailbreaking, and more.
Now that you’re armed with these security setting tricks, your information should be safe from unwelcome eyes. However, it’s wise to stay aware about possible security threats that could exploit iOS devices.
Read the full article: iPhone Security Secrets: 8 Apps and Settings You Must Know


