

How to Start Using Google Docs on Mobile Devices
Posted by SHIANNE EDELMAYER
Google Docs has become a common tool for anyone who needs to create a document. A lot of you are already familiar with the desktop version, and it may already be an indispensable tool.
If not, it can become the hub for your documents when you are traveling.
Imagine you don’t have access to your laptop on the road and you need to review a document. This situation is tailormade for the mobile version of Google Docs.
Here’s how it works.
Step 1: Set Up Google Docs on Your Phone


If you’ve never used Google Docs before, we strongly recommend that you check out our article on what is Google Docs and how to use it. Finish reading that, then come back here.
If you are familiar with Google Docs, the next thing you’ll want to do is make sure that you have the app installed on your phone. Once the app is installed, open it and log into your Google account.
Note: I’m using iOS for this tutorial, but there might be slight differences in the placement of the buttons if you’re using Android. Google is great at streamlining their apps, so any changes should be minimal.
After you sign in, you’ll be taken to a page that looks similar to the left screenshot. If you click on the six squares in the top right-hand corner of your screen, Google Docs will switch your documents to Grid view.
When you’re in Grid view, you’ll see a preview of each document you recently opened. An example of this can be seen in the middle screenshot, located above.
The Main Google Docs Controls
If you click on the three horizontal lines in the top left-hand corner of your screen, Google Docs will expand your app’s main controls. Here you’ll find:
- Recent documents.
- Starred documents.
- Documents that are “Shared with me”.
- Your Trash.
- A link to your Google Drive.
- Your Settings.
Your Google Account Details
At the very top of this menu—where you see the blue circle in our third screenshot—you’ll find a section that contains your avatar, your user name, and your email. You’ll also see a small, downwards-facing grey arrow next to that.
This arrow allows you to access a dropdown menu that controls your account. When you click on it, you’ll be faced with three options:
- Manage your Google Account.
- Add another account.
- Manage accounts on this device.
Press that dropdown arrow now.
Step 2: Adjust Your Google Account Settings


To Manage your Google Account, press the corresponding button that says the same thing. On the new screen, you can control:
- Personal info.
- Data & personalization.
- Security.
- People & sharing.
To Add another account—so you can switch between different documents stored on different Google Drive accounts on the same device—press the corresponding button located in the same dropdown menu. Google may prompt you with a push notification, letting you know that “Docs” wants to use google.com to sign in.
If you get this notification, press Continue. Once you do, you’ll be taken to the official sign-in page.
Note: If you have two-step verification activated, you’ll still need to enter this information on the mobile too.
Remove a Google Account


Let’s say you want to switch accounts instead of having multiple accounts running on the same device. To do this, choose Manage accounts on this device from the dropdown menu.
Once there, press Remove from this device to sign yourself out.
Note: If you remove your account from the Docs app, Google will remove your account’s access from all Google apps that are active on your phone. This includes Gmail if you’re using it.
When you press Remove from this device, you’ll be sent one last notification to make sure you’re okay with this action. If you are, click Remove.
After that, Google Docs will sign you out. You can log back in with your new account.
Step 3: Create a New Document


Once you’re re-logged in, Google Docs will return to the app’s main page. If you’ve never used the app with this second account, it will show you a slightly different log-in screen that gives you a basic overview of the app and what’s changed with it.
In this case, one of these changes is the ability to work offline. Click Got it to dismiss this section, then go down to the multicolored + sign in the bottom right-hand corner. Click on it to create a new document.
Google Docs will grey out your screen and prompt you to create a document from two different options:
- Choose template.
- New document.
I chose New document, because I like creating my documents from scratch.
Once you pick the option that’s right for you, Google Docs will ask you to name it. After you name your document, press Create.
Step 4: Learning the Google Docs Workspace


After you create your document, you’ll be taken to a pared-down version of the Google Docs workspace, where you can start typing. To type, press the blue pen icon in the bottom right-hand corner of your screen.
Beneath your workspace (and above your keyboard), you’ll see your text formatting options. Along the top of your workspace, there’s a blue checkmark. This checkmark allows you to exit your document’s workspace once you’re done typing.
Next to that blue checkmark, you’ll see the Undo and Redo buttons. You’ll also see the + sign for the Insert menu, and an A symbol for advanced formatting options.
At the very end of this toolbar are three dots representing another collapsable menu—one that controls your document’s overall details. Click on these dots.
Once the menu expands, you’ll see options for:
- Print layout.
- Suggest changes.
- Find and replace.
- Page setup.
- Details.
You’ll also see the toggle that will allow you to view your document offline, should you choose to do so. You can explore each of these options on your own.
If you’re happy with your current settings, press on the greyed out area next to the menu to exit it. Google Docs will take you back to the workspace.
Adding Comments


Leaving feedback on other documents is one of the most well-liked (and well-known) features of Google Docs. You can do this on the mobile app, too.
There are a couple of different ways to add a comment. The easiest method is to highlight a word or phrase. Once you do, choose the option to Add Comment when the formatting box pops up. After this, you’ll be taken to a separate window where you can start tying.
Once you’re done typing, click on the blue arrow to implement the changes. Google Docs will take you back to the main screen and leave your comment intact.
Step 5: The Insert Menu


When you’re working on mobile, you might want to insert something into your document, whether it’s a link, an image, or a table.
To do this, go to the + sign at the top of your workspace. This will expand the Insert menu, where you have multiple options to include different types of content.
Step 6: Your Updated Document List


There are a lot of tools we’re skipping today, simply because there’s little difference between the mobile and desktop versions of them. But let’s say you’re ready to exit your document and go back to your main screen.
To exit your document, press the blue checkmark in the top left-hand corner.
If you’re on iOS, this blue checkmark will turn into a grey, sideways arrow. By pressing on that grey arrow, you’ll be taken to the main menu.
From there, you should see an updated list of documents. The document you just worked on is at the top.
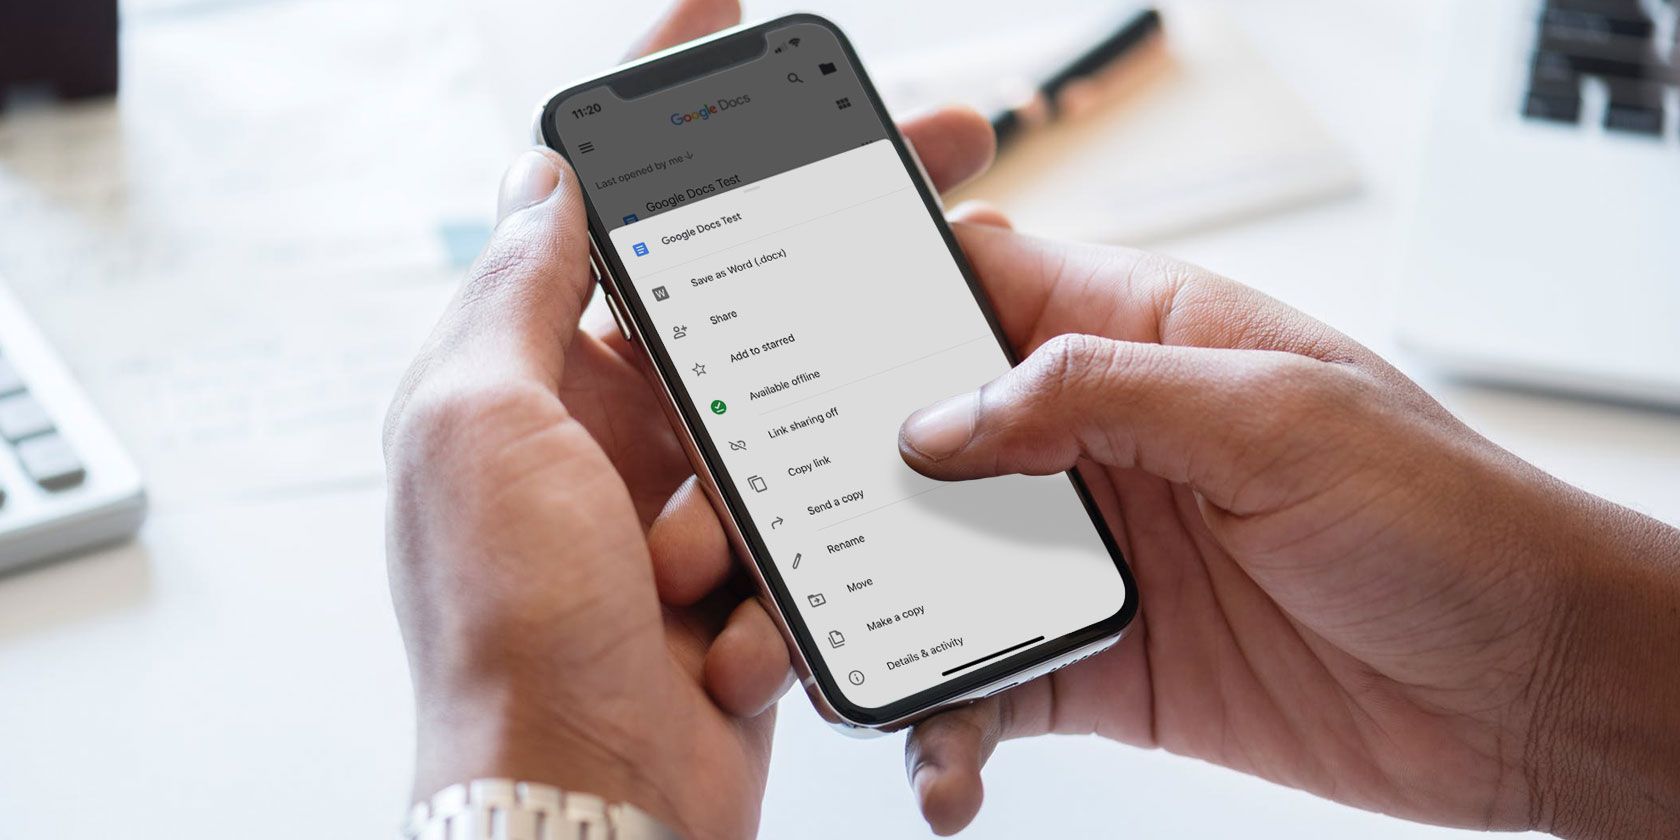
Click on the three dots next to that document. You’ll be taken to a third menu where you can see top-level actions about that file and where it’s located on your Drive.
This menu is different from the main menu that controls the app. It’s also different from the menu that you saw in your workspace, where you can set up the specific dimensions of your project.
Instead, this menu allows you to Share the document, Move it, and Rename it. Once you’ve fiddled around with the controls, you’re done. Feel free to exit the app.
Get Things Done With Google Docs
With these basic steps under your belt, you should be comfortable working with Google Docs on mobile. The mobile app will never take the place of the desktop version, but it’s definitely good to have in a tight spot.
Looking for other tips and tricks that you can learn? Here’s how to embed a Google Slide into a Google Doc.
Read the full article: How to Start Using Google Docs on Mobile Devices


