

How to Add More Storage to Your MacBook: 6 Methods That Work
Posted by TIM BROOKES
You thought you could save some money on your MacBook by opting for a model with less storage, and now you’re regretting that decision. Fortunately, you don’t need to buy a whole new computer to add more storage.
Apple hardware is built to last—there’s a good chance your MacBook has many years left in it. We’ll show you both cheap and elaborate options for adding more storage to your MacBook.
1. External Hard Drives
You may already have an external hard drive. They’re handy for backing up your Mac using Time Machine, but you can also partition your backup disk and use it as a regular drive too. These relatively cheap storage accessories offer high capacities and are much smaller than they once were. Plus, most no longer require separate power supplies.
While the physical size and price of external storage has shrunk over the years, these drives are still fragile and slow. Hard disk drives still use an arm-and-platter arrangement, which means they need time to “spin up” and are prone to mechanical failure. External hard drives don’t stand up well to drops. You also have to carry them with you, and they occupy one of the few USB ports your MacBook has. On a newer MacBook, you’ll probably need a USB-C adapter too.
Storing data on external drives works well in certain situations. You might use them to hold large media files that aren’t part of your libraries, archived documents and project files, RAW photos, backups, and disk images. While you can span your iTunes library across multiple volumes using an app like TuneSpan, you can’t do the same for your ever-expanding photos library without moving the whole thing.
Something basic like Western Digital’s Elements USB 3.0 drive will do the trick for most external storage needs. Whatever you buy, make sure it’s at least USB 3.0.
WD 2TB Elements Portable External Hard Drive - USB 3.0 - WDBU6Y0020BBK-WESN WD 2TB Elements Portable External Hard Drive - USB 3.0 - WDBU6Y0020BBK-WESN Buy Now At Amazon $64.99Bottom line: A slow but cost-effective way of adding a large amount of storage to your MacBook. But you have to carry it with you, and it’s fragile. You might want to keep your external drive for only backups, archives, and home use.
2. Thunderbolt RAID Systems

Thunderbolt is an ultra-fast interface developed by Apple and Intel. It’s an active cable, rather than the passive USB standard. That means it can carry a lot more bandwidth, which makes it perfect for transferring or accessing files on an external storage medium.
RAIDs use two or more drives for a flexible storage solution. You can use RAID to create a failsafe mirror of all your files, combine several drives into a single volume, and increase read/write times by storing parts of files on different drives. Some systems—like the LaCie 2big—come with drives. Others systems ship with just the arrays and allow you to source the drives yourself.
LaCie 2Big Dock 8TB RAID Thunderbolt 3 7200RPM External Hard Drive + 1mo Adobe CC All Apps (STGB8000400) LaCie 2Big Dock 8TB RAID Thunderbolt 3 7200RPM External Hard Drive + 1mo Adobe CC All Apps (STGB8000400) Buy Now At Amazon Too low to displayThe combination of Thunderbolt and RAID has given birth to a new breed of external drive. These include multiple bays for several full-sized hard drives. If you have money to burn, you can throw a few solid state drives in there instead. Most of them are plug-and-play, while providing a huge amount of storage to choose from.
Check out our recommended Thunderbolt RAID systems for adding more storage to your Mac.
Bottom line: If you’re looking for a reliable backup solution, or you want super-fast storage, RAID is the way to go. Unfortunately, it’s likely the most expensive option on this list depending on what you go for. Thunderbolt RAID systems also have to live on your desk, since they’re much larger than portable external drives.
3. SD Cards
Older MacBooks include an SD card slot, which allows you to quickly transfer media without plugging in your media device. You can also use your SD card slot to expand your MacBook storage. SD cards are cheaper than ever; even a high capacity card like the SanDisk Extreme Pro 256GB SDXC is an affordable upgrade.
SanDisk Extreme Pro 256GB SDXC UHS-I Card (SDSDXXG-256G-GN4IN) SanDisk Extreme Pro 256GB SDXC UHS-I Card (SDSDXXG-256G-GN4IN) Buy Now At Amazon $88.40Keep in mind that on the newest MacBooks that include an SD slot, the cards don’t sit flush. This means they’ll protrude from one side of your MacBook. Aesthetic objections aside, this isn’t ideal if you’re likely to throw your MacBook in a tight-fitting bag. A stray bump could cause damage to both the port and SD card.
With a bit of care, though, an SD card can offer serious storage at a relatively affordable price. You’ll want to shop for a card that offers fast read and write speeds; check out our guide to buying the best SD card for some tips.
Bottom line: A cheap upgrade that offers decent transfer speeds, depending on what you spend. It’s a no-hassle install, but you’ll have to make a trade-off between larger, faster, and cheaper SD cards or a solution that is more aesthetically pleasing.
4. Upgrade Your SSD

On all modern MacBooks, Apple includes a solid state drive (SSD) rather than a mechanical hard disk drive (HDD). SSDs have no moving parts, which means they’re much less fragile and considerably faster than older technology. Indeed, adding an SSD is one of the best ways to make your old Mac feel like new.
If you already have an SSD, a new one won’t add much of a speed increase. But since larger drives are more affordable than they were when you bought your computer, the increased storage might still be worth it. You can get a 1TB Samsung 860 EVO SSD for a price that was unimaginable just five years ago.
Samsung 860 EVO 1TB 2.5 Inch SATA III Internal SSD (MZ-76E1T0B/AM) Samsung 860 EVO 1TB 2.5 Inch SATA III Internal SSD (MZ-76E1T0B/AM) Buy Now At Amazon $147.99You can reuse the SSD in other computers or a portable enclosure when your MacBook eventually dies. That’s why we recommend buying the biggest capacity you can afford. Keep in mind that upgrading involves opening your laptop enclosure, which will void any warranty you have on your machine.
On the newest MacBook models, the SSD comes soldered to the logic board. This renders upgrades essentially impossible, so check if your model is upgradeable before you commit to a purchase.
In many cases, you can buy upgrade kits that include everything you need to upgrade your laptop’s storage. These include instructions and even video resources. This guide on Instructables applies to most Apple laptops, but keep in mind there will be small differences for each model. Some retailers, like Other World Computing, split their kits up by model and year, which makes it difficult to buy the wrong one.
To perform an upgrade, you’ll need a new solid-state drive, screwdriver set that matches your laptop, and a spare external drive or enclosure for your old drive so you can clone it.
Bottom line: This is the fastest storage upgrade you can perform. It’s an involved but relatively straightforward installation process that rewards you with fast, hassle-free storage that goes everywhere you do. But it’s impossible on newer models.
5. Network Storage

Aside from adding storage to your MacBook directly, you can leverage some of the storage you already have elsewhere in your home. This is a cheap way of adding storage, as you might not need to buy anything to use it.
There are some drawbacks with this approach that largely depend on your network setup. A wired network will provide the most reliable speeds, though this caps out at 10Gb/sec from Cat 6 cable on the fastest network equipment you can buy.
Most of us rely on Wi-Fi around the house for convenience, and the speed you get will depend on signal quality. Even if your router is rated for 150Mb/sec, there’s no guarantee you’ll get that speed.
You’ll only be able to use network storage and its data when you’re on the same network. If you’re interested in this idea, we’ve covered a few ways to use network storage:
Bottom line: A mixed bag that’s cheap with variable speeds, but only available when you’re at home. Better network equipment and Cat 5e cable is a minimum requirement for speeds that top out at 1Gb/sec, while Wi-Fi speeds fall short.
6. Cloud Storage
You can always turn to the cloud for additional storage space. We’ve covered making a decision between network-attached storage and cloud services before, so be sure to do your research if you’re thinking of going down this route.
The biggest drawback of using the cloud as a storage device is the speed, which is limited to whatever your internet speed is. Downloading files from the cloud isn’t ideal if you’re a remote worker who often uses smartphone tethering. Any kind of bandwidth restriction, or slow shared networks are also an issue. You’ll also probably need to purchase additional storage to make this work for you.
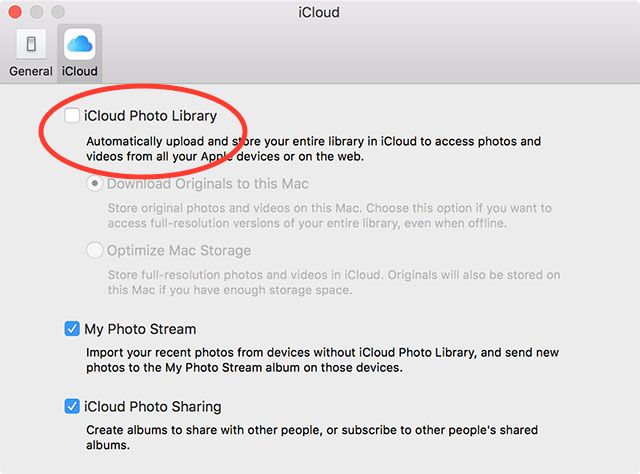
You can opt for additional iCloud storage if you want to use features like iCloud Photo Library to store your original images, and keep only local “optimized” versions on your MacBook. This ensures you have access to images, with the option of downloading a full-sized original when you need it. You can also switch your music listening to a streaming solution like Apple Music or Spotify, and listen on-demand rather than keeping media on your local device.
macOS now allows you to optimize local storage by storing files you don’t use in the cloud until you need them. The files appear on your Mac like normal, but are actually stored remotely till you access them. macOS will take care of the uploads and downloads for you, which means you’ll have to rely on your computer to choose which files are stored where.
Bottom line: A slow solution that requires an ongoing subscription, but features like iCloud Photo Library and macOS’ Optimize Storage feature can help bridge the gap between convenience and practicality.
More Storage Space on Your MacBook
Next time you purchase a new laptop, get the most storage you can afford. While an opportunity to save some money may be enticing, you could end up spending half of your laptop’s lifetime shuffling files around and running out of space.
Whatever route you go down, don’t stop at expanding your storage. There’s a lot you can do to create free space on your Mac.
Read the full article: How to Add More Storage to Your MacBook: 6 Methods That Work


